
Custom embroidery helps brands, teams, and small shops create a strong look. A clean logo on a cap or shirt can make a big impact. But an image alone is not enough for machine embroidery. Every design must be changed into a stitch file before the machine can start sewing.
Many people use professional services to Convert Image to Embroidery File because embroidery machines do not read JPG or PNG images. They only read stitch data. Years of work with logos, caps, and shirts have shown that a well-Blockedword/sentencee embroidery file helps create smooth stitches and sharp details. A good file also saves time and reduces mistakes.
This guide explains how image conversion works and why it matters for quality embroidery.
What Is an Embroidery File?
An embroidery file is a digital file Blockedword/sentencee for embroidery machines.
It tells the machine:
- Where to stitch
- Which color to use
- What stitch type is needed
- How many stitches are required
- Which direction the stitches should follow
Without this file, the machine cannot create the design.
Common Embroidery File Types
Popular file formats include:
- PES
- DST
- JEF
- EXP
- VP3
Different machines use different formats.
Why Images Cannot Be Used Directly
Many people think a machine can read a picture.
That is not true.
A JPG or PNG file only contains pixels.
Embroidery machines need stitch data.
Images and Stitch Files Are Different
Pictures show colors and shapes.
Embroidery files contain:
- Stitch paths
- Stitch types
- Thread colors
- Density settings
- Underlay settings
This is why image conversion is important.
How Image Conversion Works
The process changes artwork into machine instructions.
Professional digitizers study the design first.
Then they plan:
- Stitch angles
- Density
- Underlay
- Pull compensation
- Stitch sequence
Every detail affects the final result.
Step 1: Check the Artwork
Clear images create better embroidery files.
Blurry images often need cleaning before digitizing.
Step 2: Choose Stitch Types
Different areas need different stitches.
Common stitches include:
Satin Stitch
Best for:
- Text
- Borders
- Small shapes
Fill Stitch
Used for:
- Large areas
- Background sections
Running Stitch
Good for:
- Fine details
- Outlines
Years of embroidery experience show that proper stitch selection creates better results.
Why Logos Need Careful Digitizing
Logos contain many small details.
These details must stay clear after stitching.
Small Letters Need Adjustments
Tiny text can disappear.
Digitizers increase width and spacing to keep letters readable.
Borders Need Smooth Lines
Sharp borders improve the look of the design.
Clean stitch paths help maintain shape.
Stitch Direction Adds Texture
Changing stitch angles creates depth and shine.
This helps logos stand out.
Absolute Digitizing creates machine-ready logo files that help embroidery machines run smoothly and produce clean results.
Good Logos Start with Good Files
A strong file creates strong embroidery.
Small Changes Create Big Results
Even tiny edits improve quality.
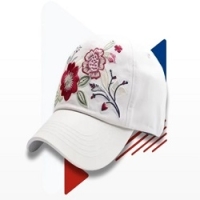
Converting Images for Caps
Caps are harder to embroider than flat items.
Their curved shape creates challenges.
Center-Out Stitching Works Best
Most cap designs start from the center.
This reduces fabric movement.
Simple Designs Stitch Better
Large shapes work well on caps.
Tiny details may not show clearly.
Strong Underlay Adds Support
Underlay helps hold the fabric.
This creates smoother stitching.
Converting Images for Shirts
Shirts are one of the most common embroidery products.
They are used for:
- Business uniforms
- Sports teams
- Company branding
Fabric Type Matters
Cotton and polyester react in different ways.
Settings must match the material.
Density Must Stay Balanced
Heavy stitching causes wrinkles.
Balanced density creates flat embroidery.
Left Chest Logos Need Accuracy
Small logos need clean stitch paths.
Proper spacing protects details.
Converting Images for Jackets
Jackets often use large designs.
Heavy materials need extra support.
Fill Stitches Cover Large Areas
Fill stitches create solid sections.
Balanced density improves appearance.
Strong Underlay Prevents Shifting
Thick fabric moves during stitching.
Good support helps maintain shape.
Stitch Flow Reduces Thread Breaks
Smooth stitch paths help machines run better.
Why Underlay Matters
Underlay sits below the top stitches.
It creates support.
Good underlay helps prevent:
- Puckering
- Gaps
- Fabric movement
Years of embroidery work have shown that underlay is one of the most important parts of digitizing.
Different Fabrics Need Different Underlay
Stretch fabric needs more support.
Heavy fabric needs stronger settings.
Proper underlay creates cleaner results.
Why Human Digitizing Is Better
Auto software is quick.
But it cannot replace sBlockedword/sentence.
Professional digitizers understand:
- Fabric behavior
- Stitch direction
- Pull compensation
- Machine limits
Human editing creates better embroidery.
Pull Compensation Protects Shapes
Thread pulls fabric inward.
Without adjustment, circles become oval shapes.
Small edits help maintain accuracy.
Absolute Digitizing focuses on manual digitizing to create clean and reliable embroidery files.
Common Problems with Poor Files
Low-quality files create many issues.
Thread Breaks
Heavy density causes stress.
Puckering
Poor support creates wrinkles.
Missing Details
Tiny text may disappear.
Distorted Shapes
Wrong stitch direction affects quality.
Professional digitizing helps avoid these problems.
Test Stitching Improves Results
Sample runs help catch mistakes.
Test Runs Find
- Gaps
- Thread breaks
- Alignment issues
- Density problems
Fixing these problems early saves money.
Years of embroidery experience prove that test stitching improves quality.
Choosing a Professional Service
Not all digitizing services are equal.
Look for:
- Experience
- Fast turnaround
- Machine-ready files
- Quality support
- Test stitch knowledge
These things improve results.
Absolute Digitizing provides quality embroidery digitizing for logos, caps, shirts, and custom apparel. SBlockedword/sentenceed digitizers understand how to create files that work well on different fabrics and machines.
Tips for Better Embroidery Results
Use Clear Images
High-quality artwork creates better files.
Avoid Very Small Details
Simple designs stitch better.
Match the File to the Fabric
Different materials need different settings.
Test Before Production
Samples help prevent mistakes.
Work with Experienced Digitizers
Experience creates better embroidery.
Why Quality Conversion Saves Money
Good files help:
- Reduce thread breaks
- Lower fabric waste
- Improve machine speed
- Create clean designs
- Increase customer trust
Quality embroidery starts with quality digitizing.
Conclusion
Learning how to convert an image into an embroidery file is important for creating smooth and professional embroidery. Whether you need logos for caps, shirts, or jackets, a quality file helps machines produce better results. Years of experience show that stitch density, underlay, pull compensation, and stitch flow all affect embroidery quality.
Professional digitizing creates cleaner designs, reduces mistakes, and saves time. With the right embroidery file, every stitch becomes more accurate and every finished product looks more professional.